本文最后更新于:2025年4月9日 下午
前言
提到 iOS 的音频,首先想到的是苹果提供的 Core Audio。Core Audio 其实是一个抽象的概念,它包含平台下所有音频相关的类库,包括 AVFoundation、Audio Queue Services、Audio Unit、OpenAL 等等。我们这次需要实现一个音频采集类,采集麦克风的原始数据给到推流 SDK 的 codec 做编码,可实现的方式有很多种,可以用 AVFoundation 获取音频设备后直接采集音频 Buffer,也可以用稍底层的 Audio Queue Services 来采集,这两种方式很方便,但有局限性,比如混音、回声消除、效果器这类功能没办法实现,所以我们使用的是苹果提供的最底层的 Audio Unit。
实现思路
Audio Unit 是一个极其强大的音频引擎模块,它将功能模块按类型划分抽象成不同的 Unit,比如输入输出的 Unit 与硬件直接交互、延迟混响类效果器 Unit 可以串联在输入 Unit 后给采集的声音添加各种效果,混音 Unit 可以将多路音频合成一路最终串联输出 Unit 送给音频设备播放,还有一些 MIDI、采样相关的 Unit 一般在编曲相关的 App 中比较常见,苹果官方的编曲软件 GarageBand 和 Logic 都是基于此来完成。与 OC 平台相比,iOS 平台上可用的 Unit 数量是比较有限的,不如 OS 平台丰富,但对于移动设备来说已经很够用了,并且随着 iOS 版本的更新 Unit 数量也在不断增加。
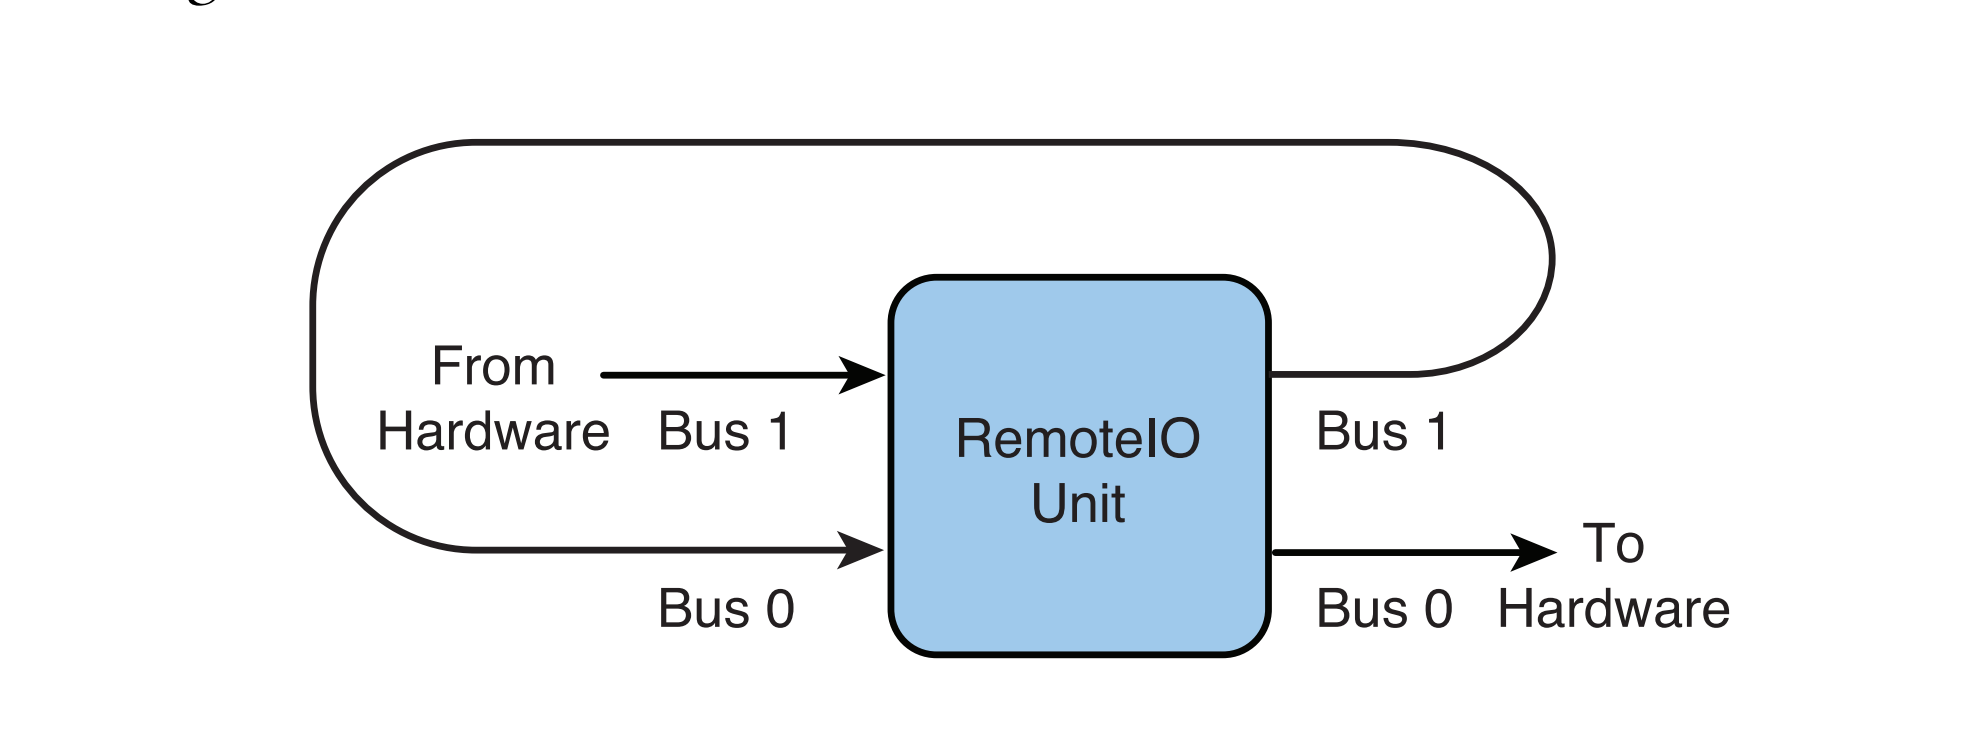
目前只需要实现采集音频的功能,所以 Unit 的类型我们选择 kAudioUnitType_Output,虽然从字面上来看这个类型像是用于输出的,但这里理解为”外设“更好一点,因为它可以包含输入和输出。kAudioUnitType_Output 类型下包含很多子类型,我们要用到的是 kAudioUnitSubType_RemoteIO:
上图是 RemoteIO Unit 的数据流向图,它包含两个 Bus(Bus 是编曲软件 Logic 的叫法,代码里一般记作 element),可以理解成是两个数据通道,Bus1 与输入设备硬件交互,Bus0 与输出设备硬件交互。还有一个 Scope 的概念,数据流从外界进入到 Bus 中的端口叫做 Input Scope,数据从 Bus 中流出的端口叫做 Output Scope,所以 RemoteIO Unit 的工作流程可以总结为:输入设备硬件采集到的数据通过 Bus1 的 Input Scope 流入 Bus1,经过 Bus1 的 DSP 处理后,从 Bus1 的 Output Scope 流入 Bus0 的 Input Scope,经过 Bus0 的 DSP 处理后发送给输出硬件设备。
我们不需要 Bus0 发送数据给输出设备来播放我们采集到的声音,所以可以用代码设置将 Bus0 关闭,同时我们希望经过 Bus1 的 DSP 处理后可以得到我们想要的数据格式,因此要给 Bus1 的 Output Scope 设置 Audio Stream Basic Description,并监听 Output Scope 的 Input 事件,在事件回调中渲染音频数据,拿到我们想要的 Buffer。
代码实现
首先需要设置 AVAudioSession,将 Category 配置为支持音频采集:
1
2
3
4
5
6
7
8
9
10
11
12
13
14
15
16
17
18
19
20
21
22
23
24
25
26
27
- (BOOL )setupAudioSession {NSError *error;AVAudioSession *audioSession = [AVAudioSession sharedInstance];48000 error:&error];if (error) {NSLog (@"set preferred sample rate failed, error: %@" , error.localizedDescription);return NO ;AVAudioSessionCategoryOptions option = AVAudioSessionCategoryOptionDefaultToSpeaker | AVAudioSessionCategoryOptionAllowBluetooth | AVAudioSessionCategoryOptionMixWithOthers ;BOOL success;AVAudioSessionCategoryPlayAndRecord withOptions:option error:&error];if (!success || error) {NSLog (@"set category failed error: %@" , error.localizedDescription);return NO ;YES error:&error];if (!success || error) {NSLog (@"set active failed error: %@" , error.localizedDescription);return NO ;return YES ;
接着初始化 Audio Stream Basic Description 用来描述采集数据的参数配置:
1
2
3
4
5
6
7
8
9
10
11
12
13
14
15
16
17
18
19
20
21
- (void )setupASBD {0 , sizeof (AudioStreamBasicDescription));1 ;1 ;16 ;8 ;48000 ;0 ;
mBytesPerFrame 和 mBytesPerPacket 最好使用已有的字段计算得出。
综上我们希望采集采样率 48000Hz,16bit 位深,单声道的 pcm数据,下面看下 Audio Unit 的使用:
1
2
3
4
5
6
7
8
9
10
11
12
13
14
15
16
17
18
19
20
21
22
23
24
25
26
27
28
29
30
31
32
33
34
35
36
37
38
39
40
41
42
43
44
45
46
47
48
49
50
51
52
53
54
55
56
57
58
59
60
61
62
63
64
65
66
67
68
69
70
71
72
73
74
75
76
77
78
79
80
81
82
83
84
85
86
87
88
89
90
91
92
93
94
95
- (BOOL )setupAudioUnit {self .audioCaptureConfig.acousticEchoCancellationEnable ? kAudioUnitSubType_VoiceProcessingIO : kAudioUnitSubType_RemoteIO;0 ;0 ;if (XPAudioUnitCheckError(NewAUGraph(&_graph), "create AUGraph error." )) {return NO ;if (XPAudioUnitCheckError(AUGraphAddNode(_graph, &acd, &ioNode), "AUGraph add node error." )) {return NO ;if (XPAudioUnitCheckError(AUGraphOpen(_graph), "AUGraph open error" )) {return NO ;if (XPAudioUnitCheckError(AUGraphNodeInfo(_graph, ioNode, NULL , &_audioUnit), "get audio unit error." )) {return NO ;0 ;1 ;UInt32 enableInput = 1 ;if (XPAudioUnitCheckError(AudioUnitSetProperty(_audioUnit,sizeof (enableInput)),"enable input bus error." )) {return NO ;UInt32 disableOutput = 0 ;if (XPAudioUnitCheckError(AudioUnitSetProperty(_audioUnit,sizeof (disableOutput)),"disable output bus error." )) {return NO ;if (XPAudioUnitCheckError(AudioUnitSetProperty(_audioUnit,sizeof (AudioStreamBasicDescription)),"set ASBD to output scope of input bus failed." )) {return NO ;void * _Nullable)self ; if (XPAudioUnitCheckError(AudioUnitSetProperty(_audioUnit,sizeof (inputCallback)),"set input callback failed." )) {return NO ;if (XPAudioUnitCheckError(AUGraphInitialize(_graph), "AUGraph init failed." )) {return NO ;return YES ;
AURenderCallbackStruct 是用来描述 Audio Unit 回调函数的结构体,inputProc 指定回调函数指针,函数会在每次 Bus1 有数据可以读取时回调,在函数中需要提供我们自己的 AudioBuffer 指针给 Bus1 做渲染,而不是直接使用函数回调的 AudioBufferList,因为它每次都是空的。inputProcRefCon 指定一个 user data,会在回调时带上这个参数,我们来看下回调函数的实现:
1
2
3
4
5
6
7
8
9
10
11
12
13
14
15
16
17
18
19
20
21
22
23
24
25
26
27
28
29
30
31
32
33
34
35
36
37
38
39
40
41
42
43
44
45
46
OSStatus AUInputCallback(void *inRefCon,const AudioTimeStamp *inTimeStamp,UInt32 inBusNumber,UInt32 inNumberFrames,nullable ioData) {1 ;0 ] = buffer;if (THIS.isMuted) {0 , buffer.mDataByteSize);else {"audio unit render failed." );if (status || buffer.mDataByteSize <= 0 ) {return status;if (THIS.delegate && [THIS.delegate respondsToSelector:@selector (microphoneSource:didGetAudioBuffer:asbd:)]) {return noErr;
准备工作完成了,现在可以调用 AUGraph 的接口开始和停止采集:
- (void )startRunning {self ->_graph), "AUGraph start error." );self .isRunning = YES ;void )stopRunning {self ->_graph), "AUGraph stop error." );self .isRunning = NO ;
释放是 AUGraph 创建的逆过程:
- (void )dealloc {
Tips:打印 Audio Unit 错误信息的工具函数,先将 OSStatus 转成大端,如果是字符就打印字符,如果是数字就打印数字,会拼接在我们自定义的错误信息之后:
static OSStatus XPAudioUnitCheckError(OSStatus error, const char *operation) {if (error == noErr) return 0 ;char str[20 ];UInt32 *)(str + 1 ) = CFSwapInt32HostToBig (error);if (isprint(str[1 ]) && isprint(str[2 ]) && isprint(str[3 ]) && isprint(str[4 ])) {0 ] = str[5 ] = '\'' ;6 ] = '\0' ;else {"%d" , (int )error);"Error: %s (%s)\n" , operation, str);return error;
后记
Audio Unit 的设计模式对于音频开发者来说是很有吸引力的,而且性能要比 Windows 和 Linux 平台要好很多,同样高灵活性组件化的代码,在配合使用上会有各种难排查的问题,开发起来会有一定难度。音频采集只是最基本的 Audio Unit 使用,后续会再添加一些其他功能,比如返听、混音和效果器串联。
关于 Core Audio 有几个网站、书籍和源码库值得推荐:
苹果官方文档 https://developer.apple.com/library/archive/documentation/MusicAudio/Conceptual/CoreAudioOverview/WhatisCoreAudio/WhatisCoreAudio.html#//apple_ref/doc/uid/TP40003577-CH3-SW1
OSStatus 错误码查询 https://www.osstatus.com/
《Learning CoreAudio》Chris Adamson、Kevin Avila
The Amazing Audio Engine https://github.com/TheAmazingAudioEngine/TheAmazingAudioEngine
Audio Kit https://github.com/AudioKit/AudioKit