iOS 使用 AVFoundation 采集相机画面

本文最后更新于:2025年4月9日 下午

前言

需求是从 iOS 内置相机采集视频画面,在手机屏幕上预览并获取视频原始数据,使用的是苹果自带框架 AVFoundation。

相机权限获取

配置 Info.plist 权限描述

根据苹果官方文档建议,如果 App 需要使用到系统硬件采集,需要在 Info.plist 文件添加相关权限使用的描述:

Configure Your App’s Info.plist File

iOS requires that your app provide static messages to display to the user when the system asks for camera or microphone permission:

For each key, provide a message that explains to the user why your app needs to capture media, so that the user can feel confident granting permission to your app.

如果没有添加权限描述就调用了采集的 API,App 会被异常终止:

Important

If the appropriate key is not present in your app’s Info.plist file when your app requests authorization or attempts to use a capture device, the system terminates your app.

验证和请求设备权限

确保在每次使用设备采集前,先对设备权限状态做验证:

Always test the AVCaptureDevice authorizationStatusForMediaType: method before setting up a capture session. If the user has not yet granted or denied capture permission, the authorization status is AVAuthorizationStatusNotDetermined. In this case, use the requestAccessForMediaType:completionHandler: method to tell iOS to prompt the user:

1
2
3
4
5
6
7
8
9
10
11
12
13
14
15
16
17
switch AVCaptureDevice.authorizationStatus(for: .video) {
case .authorized: // The user has previously granted access to the camera.
self.setupCaptureSession()

case .notDetermined: // The user has not yet been asked for camera access.
AVCaptureDevice.requestAccess(for: .video) { granted in
if granted {
self.setupCaptureSession()
}
}

case .denied: // The user has previously denied access.
return

case .restricted: // The user can't grant access due to restrictions.
return
}

核心类

首先需要搞清楚几个核心类的关系,参考苹果官网给出的这张图,图中展示的是一个既能拍照也能拍视频的相机会话的创建流程:
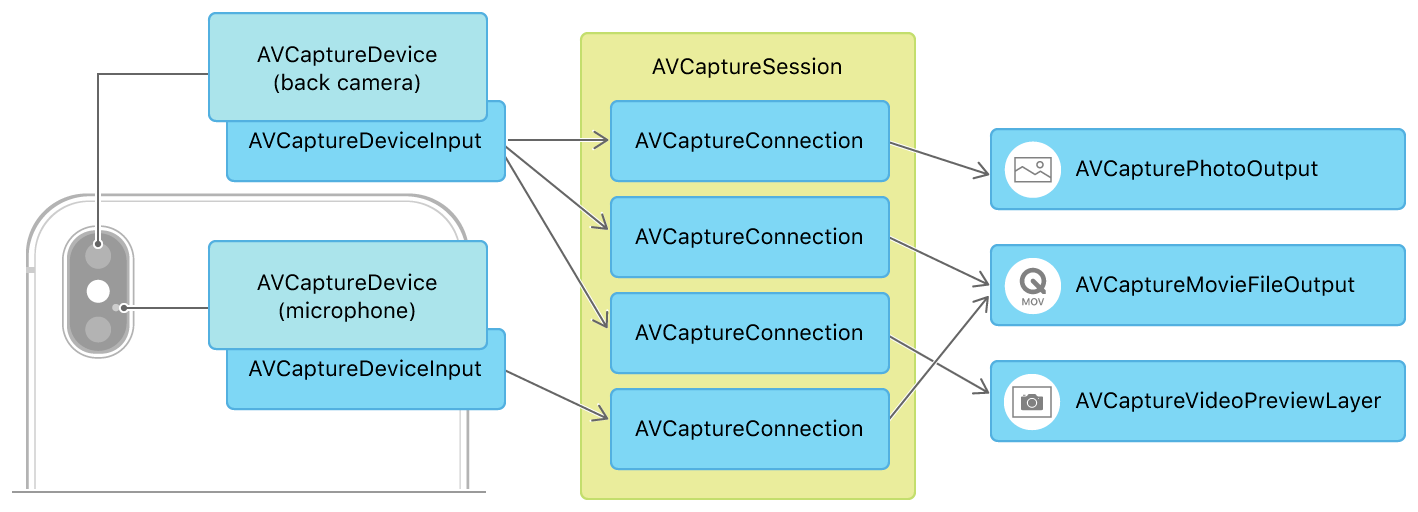
Setting Up A Capture Session

  • AVCaptureDevice

设备硬件的抽象类,iPhone 内置的采集设备包括前后置摄像头和麦克风,AVCaptureDevice 提供了这些硬件设备的参数信息和配置方法。

  • AVCaptureDeviceInput

将硬件设备采集到的数据提供给采集会话的媒介,可以想象它是硬件设备的数据接口。

  • AVCapturePhotoOutput

继承自 AVCaptureOutput。AVCaptureOutput 是控制数据输出的抽象父类,其子类有很多,各有各的用处,AVCapturePhotoOutput 一般用于输出照片。

  • AVCaptureMovieFileOutput

同样继承自 AVCaptureOutput,一般用于输出视频。

  • AVCaptureVideoPreviewLayer

继承自 CALayer,一般用于图像预览。

  • AVCaptureConnection

用于连接 Input 和 Output,是采集会话 AVCaptureSession 控制的数据流通管线。

  • AVCaptureSession

采集会话类,控制着输入和输出以及数据流通管线,是整个流程的核心。


我们来简单分析下苹果的设计,首先将所有硬件设备抽象成 AVCaptureDevice 一个类,提供统一的 API 接口,在 AVCaptureDevice 之上提供了一层 AVCaptureDeviceInput 负责和 AVCaptureSession 交互数据。

而在数据输出端,苹果提供了几个常用场景的输出子类,方便开发者直接拿到想要的数据而不需要对原始数据做处理,当然如果苹果提供的定制化输出子类不能满足开发需要,可以使用 AVCaptureVideoDataOutput 直接处理回调数据。

比较重要的是 AVCaptureConnection 这个类,虽然我们平时的需求可能就是拍个照录个视频,不太用的到这个类,但确是相当重要的,它让整个 AVCaptureSession 框架变的灵活。当我们通过 addInputaddOutput 给采集会话添加输入输出时,AVCaptureSession 会默认给每一个 Output 和对应 Input 创建 Connection,使得 Input 的数据可以给到 Output,如果是多个 Input 和多个 Output 的复杂场景,可以使用 addInputWithNoConnectionsaddOutputWithNoConnections 在不创建 Connection 的情况下添加输入输出,然后手动创建 AVCaptureConnection 给到 AVCaptureSession,这样可以在多输入输出的情况下保证数据流向,让数据消费者拿到预期设备的数据。

AVCaptureVideoPreviewLayer 这个类可以把它看成是一个特殊的 AVCaptureOutput,在初始化时同样会创建一个 Connection 连接输入源 Input,它的作用只有一个就是将输入源采集的视频画面渲染在图层上。

多输入输出的场景可以参考苹果官网同时采集前后置摄像头数据并渲染在两个图层上的 Demo:

https://developer.apple.com/documentation/avfoundation/cameras_and_media_capture/avmulticampip_capturing_from_multiple_cameras?language=objc

现在来评估下我们的需求,首先这个相机模块是集成到推流 SDK 中的,需要采集内置相机的数据,所以我们需要获取相机的 AVCaptureDevice,并创建对应的输入流 AVCaptureDeviceInput。再看输出端我们期望用采集到的数据做什么,推流 SDK 需要有预览的功能,让主播可以实时看到自己的画面,所以我们需要一个 AVCaptureVideoPreviewLayer。相机采集到的画面我们需要做美颜滤镜等效果,之后还需要实时推送到云服务器做分发,所以我们需要相机的原始数据回调,因此还需要一个 AVCaptureVideoDataOutput。我们目前有一个输入和两个输出,这种情况不需要手动创建 Connection,使用 AVCaptureSession 给我们默认创建的就好,下面我们来实现一下。

初始化

获取采集设备

1
2
3
4
5
6
7
8
9
10
11
12
13
14
15
16
17
18
19
20
21
22
23
24
25
26
27
28
29
30
31
32
33
34
35
36
37
38
39
40
41
42
43
44
+ (AVCaptureDevice *)getCaptureDevice:(AVCaptureDevicePosition)captureDevicePosition {
AVCaptureDevice *captureDevice = nil;

// find capture device
if (@available(iOS 10.0, *)) {
NSMutableArray *captureDevices = [NSMutableArray array];
if (captureDevicePosition == AVCaptureDevicePositionBack) {
NSMutableArray <AVCaptureDeviceType> *tripleCameras = [NSMutableArray array];
NSMutableArray <AVCaptureDeviceType> *dualCameras = [NSMutableArray array];
NSMutableArray <AVCaptureDeviceType> *singleCameras = [NSMutableArray array];

if (@available(iOS 13.0, *)) {
[tripleCameras addObject:AVCaptureDeviceTypeBuiltInTripleCamera];
}
if (@available(iOS 10.2, *)) {
[dualCameras addObject:AVCaptureDeviceTypeBuiltInDualCamera];
}
[singleCameras addObject:AVCaptureDeviceTypeBuiltInWideAngleCamera];

[captureDevices addObjectsFromArray:tripleCameras];
[captureDevices addObjectsFromArray:dualCameras];
[captureDevices addObjectsFromArray:singleCameras];
} else {
[captureDevices addObject:AVCaptureDeviceTypeBuiltInWideAngleCamera];
}
AVCaptureDeviceDiscoverySession *discoverySession = [AVCaptureDeviceDiscoverySession discoverySessionWithDeviceTypes:captureDevices mediaType:AVMediaTypeVideo position:captureDevicePosition];
for (AVCaptureDevice *device in discoverySession.devices) {
if (device.position == captureDevicePosition) {
captureDevice = device;
NSLog(@"device type: %@", device.deviceType);
break;
}
}
} else {
NSArray *devices = [AVCaptureDevice devices];
for (AVCaptureDevice *device in devices) {
if ([device hasMediaType:AVMediaTypeVideo] && device.position == captureDevicePosition) {
captureDevice = device;
break;
}
}
}
return captureDevice;
}

iOS 10 之前可以调用 AVCaptureDevice 的 devices 获取设备列表,iOS 10 之后稍微复杂一些,要用 AVCaptureDeviceDiscoverySession 这个类,并且需要传预期获取的设备类型,这里通过系统版本判断给后置增加了三摄、双摄、单摄的选项,前置一般只有单摄。

创建采集会话

1
2
3
4
5
// Setup AVCaptureSession
_captureSession = [[AVCaptureSession alloc] init];
if ([self.captureSession canSetSessionPreset:self.videoCaptureConfig.sessionPreset]) {
self.captureSession.sessionPreset = self.videoCaptureConfig.sessionPreset;
}

这里创建 AVCaptureSession,设置预设值 sessionPreset,设置前需要校验是否能设置这个值。

Tips:

AVCaptureSession 可以给 Inputs 下的 AVCaptureDevice 设置预设 sessionPreset,AVCaptureDevice 根据预设值调整相应的参数,有些特殊配置需要直接设置 AVCaptureDevice 的 activeFormat ,比如 iPhone 的高帧率采集。如果手动设置了 activeFormat,AVCaptureSession 的 sessionPreset 会被置成 AVCaptureSessionPresetInputPriority,之后再配置 sessionPreset 将无效。

创建设备输入

1
2
3
4
5
// Setup AVCaptureDeviceInput
_captureDeviceInput = [[AVCaptureDeviceInput alloc] initWithDevice:captureDevice error:nil];
if ([self.captureSession canAddInput:self.captureDeviceInput]) {
[self.captureSession addInput:self.captureDeviceInput];
}

用获取到的设备创建设备输入,并加入到采集会话的输入队列。

创建原始数据输出

1
2
3
4
5
6
7
8
// Setup AVCaptureOutput
_captureVideoDataOutput = [[AVCaptureVideoDataOutput alloc] init];
[self.captureVideoDataOutput setAlwaysDiscardsLateVideoFrames:YES];
self.captureVideoDataOutput.videoSettings = @{(NSString *)kCVPixelBufferPixelFormatTypeKey: @(kCVPixelFormatType_32BGRA)};
[self.captureVideoDataOutput setSampleBufferDelegate:self queue:self.operationQueue];
if ([self.captureSession canAddOutput:self.captureVideoDataOutput]) {
[self.captureSession addOutput:self.captureVideoDataOutput];
}

创建原始数据输出,我们的业务场景要保证实时性,所以将延迟丢帧开启,采集的原始数据格式设置为 32BGRA,设置好代理后,将输出加入到采集会话的输出队列。这一步完成后,AVCaptureSession 会自动创建一个 Connection 连接设备输入和原始数据输出。

获取数据连接

1
2
3
4
5
6
// Get AVCaptureConnection
_dataOutputConnection = [self.captureVideoDataOutput connectionWithMediaType:AVMediaTypeVideo];
self.dataOutputConnection.automaticallyAdjustsVideoMirroring = NO;
if ([self.dataOutputConnection isVideoOrientationSupported]) {
self.dataOutputConnection.videoOrientation = self.videoCaptureConfig.videoOrientation;
}

获取自动创建好的原始数据输出连接管线,设置视频数据是否自动调整镜像以及设置视频数据旋转方向。

创建预览图层

1
2
3
4
5
6
7
8
9
10
11
12
13
14
15
16
17
18
19
20
@interface XPCameraSourcePreviewView ()

@property (nonatomic, strong) AVCaptureVideoPreviewLayer *previewLayer;

@end

@implementation XPCameraSourcePreviewView
- (void)setupCaptureSession:(AVCaptureSession *)captureSession {
dispatch_async(dispatch_get_main_queue(), ^{
if (self.previewLayer) {
[self.previewLayer removeFromSuperlayer];
self.previewLayer = nil;
}
self.previewLayer = [[AVCaptureVideoPreviewLayer alloc] initWithSession:captureSession];
self.previewLayer.frame = self.bounds;
self.previewLayer.videoGravity = AVLayerVideoGravityResizeAspectFill;
self.previewLayer.connection.automaticallyAdjustsVideoMirroring = NO;
[self.layer addSublayer:self.previewLayer];
});
}

可以直接在 View 子类中重写 layerClass 方法指定 AVCaptureVideoPreviewLayer,也可以像上图这样持有一个 AVCaptureVideoPreviewLayer 对象,初始化完成后添加到 layer 上,此时会自动创建一个 AVCaptureVideoPreviewLayer 和相机输入的 Connection。

开始采集

初始化完成后,可以直接调用 AVCaptureSession 的 startRunning 开始采集。

1
2
3
4
5
- (void)startRunning {
NSLog(@"CameraSource: startRunning");
[self.captureSession startRunning];
_running = YES;
}

停止采集

1
2
3
4
5
- (void)stopRunning {
NSLog(@"CameraSource: stopRunning");
[self.captureSession stopRunning];
_running = NO;
}

后记

写完 webSocket 那篇之后,就开始准备推流 SDK 了,视频采集是第一个要完成的模块,自己也是破天荒的看了苹果官方文档,有了一个大致的了解。后续要做的事情还很多,下一步是要把原生的渲染拿掉,使用 OpenGL,又是一大姿势要去啃,加油吧骚年!